
Hope this give you some ideas for Valentines and enough time to get them done.
Thanks for Buzzing by,




 |
| HAPPY FALL from the Busy Bee's! |


 Welcome FALL, my favorite!! These pumpkins are so easy. I just drew them up the smallest one and then added another set of bumps to the next and next to make them match. I cut them from a 1X4 with my scroll saw and painted them. There are lots of fun FALL things that you could use to decorate them to your liking. Be creative!! Thanks for Buzzing by,
 For these gift bags I cut For these gift bags I cut  them out of 1/4 inch pine. I cut them out on my scroll saw. I drilled a hole in the middle to cut out for the handle, then I threaded my blade in the hole I drilled to saw it. I glued them and nailed them with my brad nailer. Just paint and mod podge something you like on them for an original gift bag. them out of 1/4 inch pine. I cut them out on my scroll saw. I drilled a hole in the middle to cut out for the handle, then I threaded my blade in the hole I drilled to saw it. I glued them and nailed them with my brad nailer. Just paint and mod podge something you like on them for an original gift bag.
Thanks for Buzzing by,
|
 |
| The top hat is made from 3/4 inch pine. The base is made from a 2X4. A hole was drilled in the 2X4 straight up and down and on a 45 degree angle on the 3/4 inch pine. Cut a dowel the height you need and glue it into place. |
 |
| Ta Dah! No, messed up brims. |
 I just drew these up and cut the flower and leaves out of 3/4 inch pine. The centers are 1/4 inch oak panelling. I cut them out on the scroll saw. I added floral moss before I glued the centers on. Then I just twisted some wire for a fun spring look. Very simple, but still cute. Thanks for Buzzing by,
 |
| Have you seen the post of people using pennies for floors? That is where this idea came from. I spray painted the tray. After it dried I used Mod Podge and put it on a section of the box. You will have to work quickly. I put out a few rows and them just kept adding more Mod Podge to the bottom and starting to add it to the top and fill in the gaps between the pennies. |

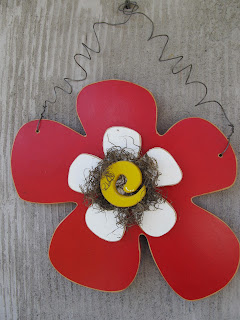 |
| I cut this out on my scroll saw. I just drew up a pattern for it. I cut the red flower out of MDF so it could be larger. I painted it and sanded the edges. The white flower is cut from 3/4 inch pine. The swirl is cut from 3/4 in pine. I glued it all together with wood glue, including the floral moss. I drilled some pilot holes to insure that nothing broke. Then I ran some screws through it from the back to make sure it holds together well. I drilled holes in it and added the wire. I just twisted it because I like the look.
Thanks for Buzzing by,
|
 |
| This is just a simple little sign. The lettering is vinyl. I painted it light green and the edges are darker green with it just brushed around the outside edges of the top. The fish are just stained. I bought them at a craft store.
Thanks for Buzzing by,
|
 |
| This is a fun and really easy scarf made from a T-shirt. There are 13 strips in this one. Use a 9" circle and cut out spirals. Then stretch them to curl the edges for the curvy look. Each strip will stretch to be half the length of the scarf. Use fabric glue to secure in the back. Tie a knot with a small piece that secures them together. A hair scrunchy and flower have been added on the side. Change them out to mix and match different outfit. BE CREATIVE!! Check out this video for a few other ideas ~ still no sew. Very fast and easy. http://studio5.ksl.com/index.php?nid=61&sid=14428842&s_cid=E0002 |
| I saw this on pintrest and had to do this! Cause we all now how fast babies grow and with me having a little baby again I had to do this quick before she gets even bigger. |
| Here is the recipe: 12 small hand prints 4 Cups flour 1 Cup salt 1 1/2 Cups water Directions: Combine and knead dough for 15-20 minutes. Roll dough out and cut around hands and cut circles out for making hand imprints. Use cookie cutters for ornaments or gift tags. If necessary, slightly dampen pieces to make them stick together. Make a small hole for the hangers and prick to prevent air bubbles. Bake at 300 degrees about 20-25 minutes or until golden. You may have to bake considerably longer depending on how thick your items are. They may not feel hard right away but will harden as they cool. Tip: Make sure to use a nonstick surface, or spray cookie sheet with pam. If you get some stickage, cover the back with felt or cardstock. attach with hot glue gun. Paint and decorate as desired. Acrylic paints work best and use a varnish to make them shiny. |


 |
| These flowers I just drew up and cut out on my scroll saw. The flower, the center and leaves are all 3/4 inch pine. I glued them and screwed them to a garden stake. |

